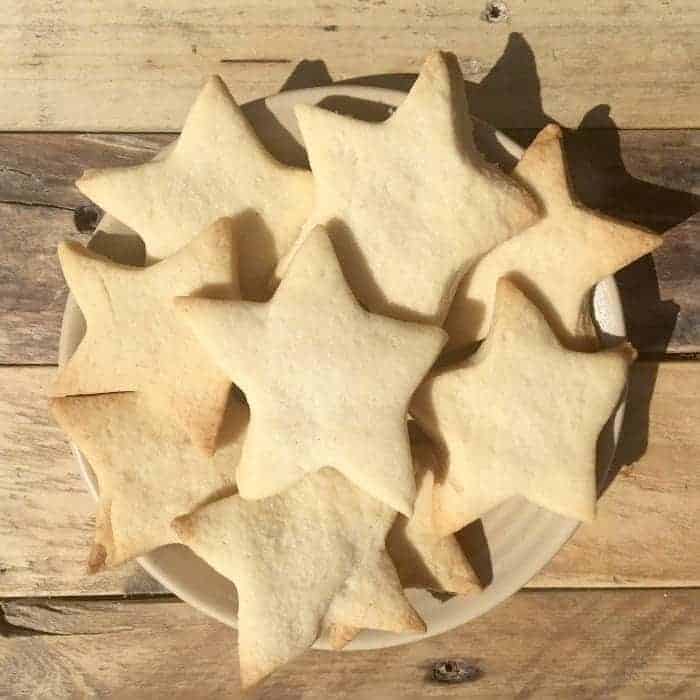
If you’ve never made homemade shortbread before, you’re in for a treat.
There are some recipes that I come back to time and time again, and this is definitely one of them. It only uses three everyday ingredients, takes very little effort and somehow tastes so much better than shop-bought shortbread.
For years, I thought shortbread would be one of those recipes that was difficult to get right, but I promise you that it couldn’t be easier. If you can mix three ingredients together, you can make these delicious shortbread biscuits.
Start Here
This recipe is part of my Start Here series, where I share simple base recipes that can be adapted into lots of different flavours and variations. Learn the basic recipe first and come back throughout the year as I share new twists, seasonal ideas and different ways to make it your own.
Why You’ll Love This Recipe
- Only three ingredients.
- Perfect for beginner bakers.
- Deliciously buttery and crumbly.
- Great for baking with children.
- Freezes well.
- Easy to adapt into lots of different flavours.
Ingredients
- 100g unsalted butter, softened
- 50g caster sugar
- 150g plain flour
Optional:
- A little extra caster sugar for sprinkling over the top before baking.
Method
Preheat your oven to 170°C fan (190°C conventional) and line a baking tray with baking paper.
Cream the softened butter and caster sugar together until they’re light and smooth. You can do this by hand, but I usually let my mixer do the hard work.
Gradually add the flour, mixing until a soft dough forms. Towards the end, you might find it easier to use a wooden spoon or your hands to bring everything together.
If the dough feels a little soft or sticky, pop it into the fridge for 15 to 20 minutes before rolling it out. It isn’t essential, but it does make the dough easier to work with.
Lightly flour your work surface and rolling pin before rolling the dough to around 1cm thick. Cut out your favourite shapes using biscuit cutters or simply cut it into fingers if you prefer a more traditional shortbread.
Transfer the biscuits to your prepared baking tray, leaving a little space between each one. If you like, sprinkle over a little extra caster sugar.
Bake for 12 to 15 minutes, checking from around the 10-minute mark. The biscuits are ready when the edges are only just beginning to turn golden. Shortbread should stay fairly pale, so don’t be tempted to leave it in until it’s dark brown.
Leave the biscuits on the tray for five minutes before transferring them to a wire rack to cool completely. They’ll become firmer as they cool.
How do you know when Shortbread is cooked?
Shortbread can be a bit hard to judge because it doesn’t behave like cakes or biscuits and will often still feels soft when it’s actually done.
Here’s what I look for:
- The edges should just be starting to turn a pale golden colour. The top should stay mostly pale rather than browning all over.
- The centre should look set. It might still feel slightly soft if you gently touch it, but it shouldn’t look wet or shiny.
The most important thing is don’t wait for it to go crisp in the oven. It crisps up as it cools. If you bake it until it’s hard, it will usually end up dry and crumbly rather than that lovely melt-in-the-mouth texture.
Top Tips
- If your dough feels sticky, chill it for 15 to 20 minutes before rolling.
- Try not to overwork the dough as this can make the finished biscuits less crumbly.
- For a more traditional look, prick the tops with a fork before baking.
- Store your shortbread in an airtight tin and it’ll stay fresh for up to a week.
Coming Soon…
This simple recipe is the base for lots of delicious variations that I’ll be adding to over time.
- Lemon Shortbread
- Chocolate Chip Shortbread
- Jam Sandwich Shortbread
- Chocolate Orange Shortbread
- Cinnamon Shortbread
- Christmas Shortbread
- Mini Egg Shortbread
I’ll update this list with links as each recipe is published.
A Little Tip From Me
Homemade shortbread makes a lovely little gift. I often pop a few biscuits into a pretty tin or wrap them in a cellophane bag tied with ribbon when we’re visiting friends or family. It costs far less than buying luxury biscuits from the supermarket, but somehow always feels that little bit more special because it’s homemade.
Whether you’re baking these for an afternoon treat, popping them into a lunchbox or making a batch as the starting point for one of the flavoured versions, I hope you enjoy them as much as we do. If you give them a try, I’d love to hear which variation you’d like me to make next!
I’d love you to follow me on Twitter and it would be amazing to see you over on my Facebook page and on Instagram. If you’re interested, you can find out more about me here and while I’ve got your attention, if you’re wondering why some of my posts lately are a little bit less frugal then have a read of this post. 😉
Do your future self a favour – Pin this post for later.


Discover more from The Diary of a Frugal Family
Subscribe to get the latest posts sent to your email.







Talk to me...